Getting Started
This document will help you get your server setup and ready to get Shadow Store running on it!
You must be doing this on a VPS or dedicated server, and keep in mind all install guides are for an Ubuntu 24.04 LTS Linux VPS.
Make sure that you have read through our prerequisites to prevent any issues later on.
And if you haven't already, make sure you have an A record on your domain pointed to the IP of your server.
Before we begin, lets make sure everything is up to date and you have curl installed:
sudo apt update
sudo apt install curl
Install Node.Js
Node.Js is a very popular framework for Javascript used to manage many different types of applications. Shadow Store is one type of application that requires it to be run, and since Node.Js has many versions we will be using Node Package Manager (NVM) to ensure the correct version is installed and running on our system.
Install NVM and the correct Node.Js version:
curl -o- https://raw.githubusercontent.com/nvm-sh/nvm/v0.40.3/install.sh | bash

nvm install 23.1.0
You will likely need to reopen the console after installing NVM to actually be able to run the install command.
If you want to see if it has installed and is running the correct node version (23.1), you can run: node --version in your console.
Install Forever (Optional)
Forever is a Node.Js package used to manage and run node applications. We will be using it to prevent download and auto-restart the application if a major error causes it to crash. It will also log all console outputs to a file.
This is optional as you can run the application without this or a different manager like PM2. It is up to you; however, this guide will assume you are using forever.
Globally install forever:
npm i -g forever
If you want to see if it worked, you can run forever list (this also will show any apps being managed by forever).
Install Nginx
Nginx is the program that we will use to route and proxy all Shadow Store so it properly appears to the world on your domain.
sudo apt install nginx
You will be prompted to press Y while installing, do it.
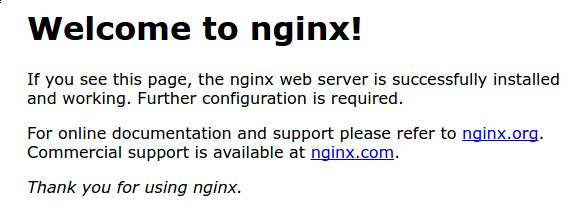
Once it is installed, you should be able to navigate to your servers IP and you will be met with the default nginx page (seen below).
http://server_IP

If you see this, you've got nginx install correctly! Congrats!
Installing Certbot
Certbot will allow you to automatically issue and install SLL certificates onto your domains.
sudo apt install certbot python3-certbot-nginx
MongoDB
MongoDB is the database program which Shadow Store uses to store all its data. MongoDB is a JSON based database which makes it easy to read and understand.
Install MongoDB
-
Import the public key
- From a terminal, install gnupg and curl if they are not already available:
sudo apt-get install gnupg curl- To import the MongoDB public GPG key, run the following command:
curl -fsSL https://www.mongodb.org/static/pgp/server-8.0.asc | \
sudo gpg -o /usr/share/keyrings/mongodb-server-8.0.gpg \
--dearmor- Ubuntu 24.04 (Noble)
- Ubuntu 22.04 (Jammy)
- Ubuntu 20.04 (Focal)
echo "deb [ arch=amd64,arm64 signed-by=/usr/share/keyrings/mongodb-server-8.0.gpg ] https://repo.mongodb.org/apt/ubuntu noble/mongodb-org/8.0 multiverse" | sudo tee /etc/apt/sources.list.d/mongodb-org-8.0.listecho "deb [ arch=amd64,arm64 signed-by=/usr/share/keyrings/mongodb-server-8.0.gpg ] https://repo.mongodb.org/apt/ubuntu focal/mongodb-org/8.0 multiverse" | sudo tee /etc/apt/sources.list.d/mongodb-org-8.0.listecho "deb [ arch=amd64,arm64 signed-by=/usr/share/keyrings/mongodb-server-8.0.gpg ] https://repo.mongodb.org/apt/ubuntu jammy/mongodb-org/8.0 multiverse" | sudo tee /etc/apt/sources.list.d/mongodb-org-8.0.list -
Create the list file
- Create the list file
/etc/apt/sources.list.d/mongodb-org-8.0.listfor your version of Ubuntu.
- Create the list file
-
Reload the package database
- Issue the following command to reload the local package database:
sudo apt-get update -
Install MongoDB Community Server
- You can install the latest stable version of MongoDB.
sudo apt-get install -y mongodb-org
Run MongoDB
We will be using systemd to run and manage MongoDB. You may use init if you wish, but this guide will not teach that.
-
Start MongoDB
- You can start the
mongodprocess by issuing the following command:
sudo systemctl start mongod- If you receive an error similar to the following when starting
mongod:Failed to start mongod.service: Unit mongod.service not found.Run this command:
sudo systemctl daemon-reloadThen run the start command again.
- You can start the
-
Verify that MongoDB has started successfully
sudo systemctl status mongod -
Ensure that MongoDB will start following a system reboot
sudo systemctl enable mongod